

Some of you have mentioned an interest in creating macros for Roll20 recently. I’ve put together a mini-guide on what I’ve learned about them below.
Table of Contents
What Is A Macro?
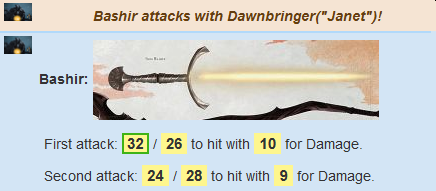
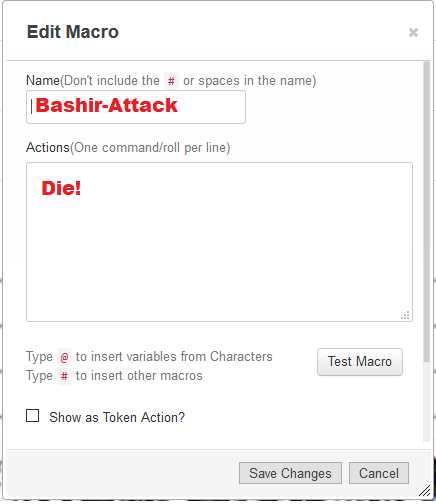
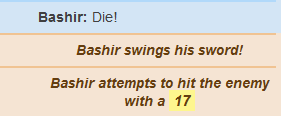
For our intents and purposes, a macro is basically a pre-generated chat message. Everything you can do in a macro you can do manually by typing it into Roll20 chat. But, to save yourself some time, you create a macro so you don’t have to laboriously type it out every time you want do a certain action. For example, here is what my attack macro looks like for Bashir:
Within this “pre-generated chat message” in the form of a macro you can also embed dice rolls, include pictures, third-person character actions, etc. Plus, when properly created, it looks much nicer than having just a long list of confusing dice rolls cluttering up the Roll20 chat.
How Do I Create A Macro?
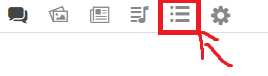
You can only create a macro within a Roll20 game, so log into Roll20 and click on “Launch Game” . From within there, click on the “Collection” tab:
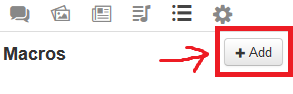
Then click on “Add“:
This will bring up the following screen:
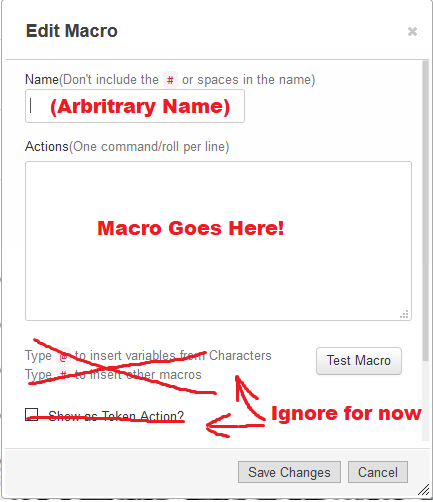
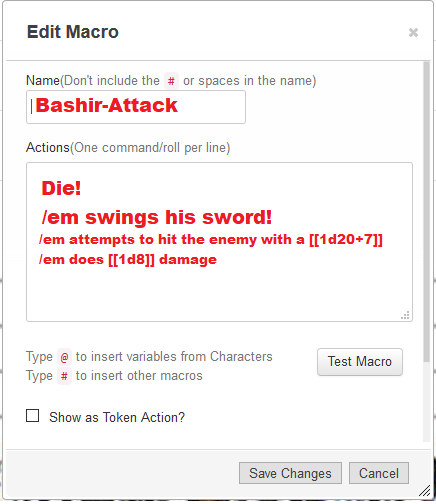
Under “Name”, just create a name for your macro like “Bashir-Attack” or something. It automatically puts in hyphens for spaces.
Under Actions is where you write the chat commands for the macro. There are a number of things you can make your macro do.
Making Your Character Speak
Just typing into the “Actions” box straight up without anything extra will make your character say those things. For example, typing in:
Will have the following output in the chat box:

Pretty easy. Now lets make our macro a little more complicated.
Making Your Character Do Actions
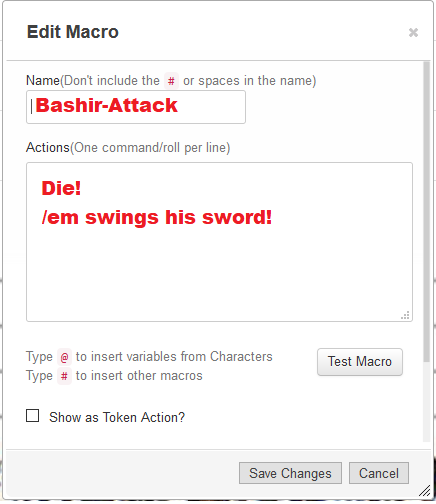
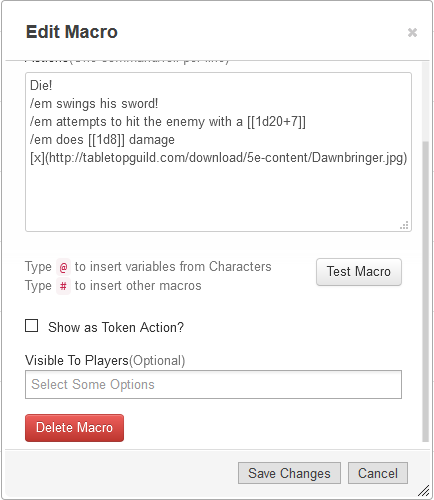
You can also make your character do actions, or “Emotes“. Remember, these are all things you can already do in chat! To make Bashir swing his sword, use “/em” before you type the action. For example:
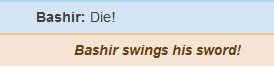
Will have the following output:
Pretty neat. Now to add the most important part, the roll.
Adding Dice Rolls to Macros
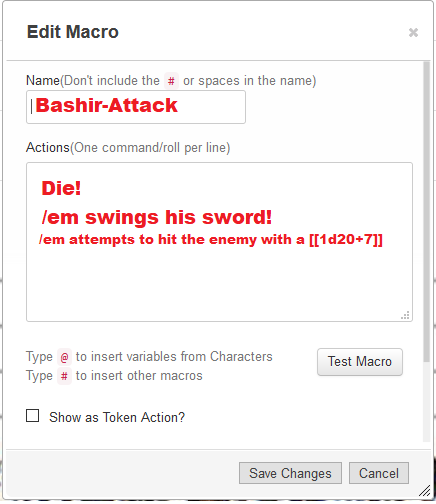
Perhaps the most useful function of macros, it allows you to embed rolls anywhere in your chat output in a very clean fashion that doesn’t clutter up everyone chat interface. To do so, you simply type the dice roll between double “[[ ]]” brackets. It can include some basic math as well. For example, if you wanted Bashir to swing the sword with a d20 and he has a +7 to hit, you would write:
Will result in the following:
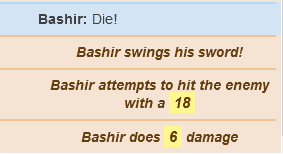
You can add any dice you want, for example if you want to do damage with a d8, you would simply add the following:
Will result in the following:
You can also account for things such as an increased critical range (i.e. if 19s are also crits for you), but that is currently beyond the scope of this particular guide. Now for the fun part – adding some flair to your macro.
Embedding Images in Macros (and Chat)
Like everything in this guide, linking an image works the same in macros as it does in the actual chat tab during a Roll20 game. I know there has been some confusion regarding this that will hopefully be cleared up below.
To embed an image in chat or a macro requires the same syntax: you always start out with the characters “[x]” followed by the image link between parenthesis “( image location )“. So basically:
[x](image_url) |
| Type the bold characters exactly as seen. No spaces, no quotes. Replace “image_url” with the web address of the image you are linking. |
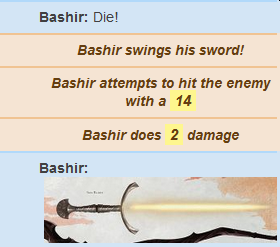
So for example, if I wanted to add an image of Dawnbringer to my swing, I would type [x](https://www.tabletopguild.com/download/5e-content/Dawnbringer.jpg):

To get the following chat result:
Why Isn’t My Image Working?
Often when you try to link an image all you will get is a broken link that goes nowhere and looks like x.
Unfortunately, images not linking correctly in Roll20 is a common problem. Roll20 is fairly strict in linking images. They must:
- End exactly with the three letter image file extension: “.gif”, “.png”, “.jpg”. A lot of image urls end in a bunch of gibberish after the image name that is quite frankly unnecessary.
- Roll20 hates .webp images. There is no support for them despite them being one of the most common images on the Internet (you see them all the time in Google Image Search). You have to convert them if you want to use them; more info below. It doesn’t help that .webp files sometimes masquerade as a .jpg or .gif file.
How To Get The Image Working
- If you look in the address bar, after the three letter image file extension, there’s sometimes a whole bunch of unnecessary gibberish you can select/highlight and delete. Pressing enter after doing so and reloading the image will work about 80% of the time.
- If that doesn’t work, the simplest way to ensure an image works is to Save the file and Upload the file again to a hosting service, such as Imgur. Then, you simply link the file directly. A pain in the ass, but it almost always works, unless it is a .webp file.
This doesn’t work if you have a .webp file. In this case you must covert .wepb files at this website, from which you can then link it directly.
Some .gif files are also actually movie files pretending to be gifs. You can give it a shot and convert them at this website but I make no guarantees.
My Macro Is Ready. How Do I Activate It?
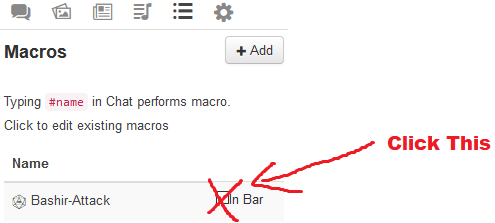
After you click “Save Changes” when you are done writing your macro, you will probably find yourself back on the Collections tab in Roll20. To make your macro visible, simply click the “In Bar” option next to the macro.
This will make it appear at the bottom of your play screen, where you can click it:
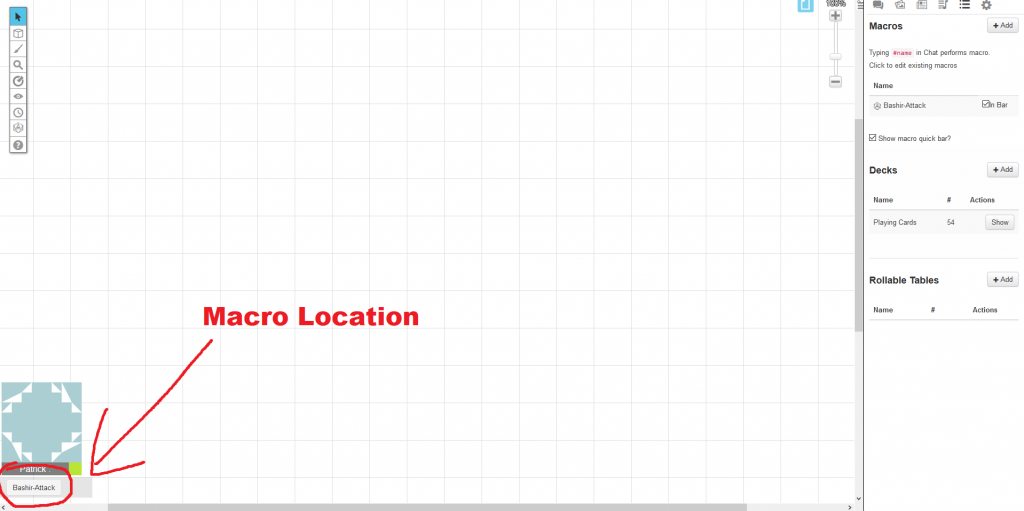
Simply click the macro’s name and you’re good to go! You can make a long list of macros and activate or deactivate them as you need them, keeping the ones you use frequently on you Macro Bar at the bottom of your screen. To deactivate a macro, simply uncheck the “In Bar” option again on the Collections tab next to the macro you want to deactivate.
Deleting a Macro
Sometimes you just want to get rid of a macro. Easy enough, but somewhat hidden, is the red “Delete Macro” button hidden in the “Edit Macro” screen. It’s a bit hard to see; you have to scroll down a bit to find it.
Parting Words
Hope you all enjoyed the guide. If you have a suggestion for other areas you think need a guide, feel free to comment below. Or hell, write it yourself! If you want to submit a guide, send it to my email at mehxistence@tabletopguild.com and I’ll format it nice and neat on the website.
Thank you for your sharing. I am worried that I lack creative ideas. It is your article that makes me full of hope. Thank you. But, I have a question, can you help me?
Thank you for your sharing. I am worried that I lack creative ideas. It is your article that makes me full of hope. Thank you. But, I have a question, can you help me?
Thanks for sharing. I read many of your blog posts, cool, your blog is very good.